The Documents tab allows you to add documents that are either globally accessible or accessible only by users in a certain department.
To Add a Document
-
From any page, go to Administration: System Settings.
-
Click the Documents tab.

-
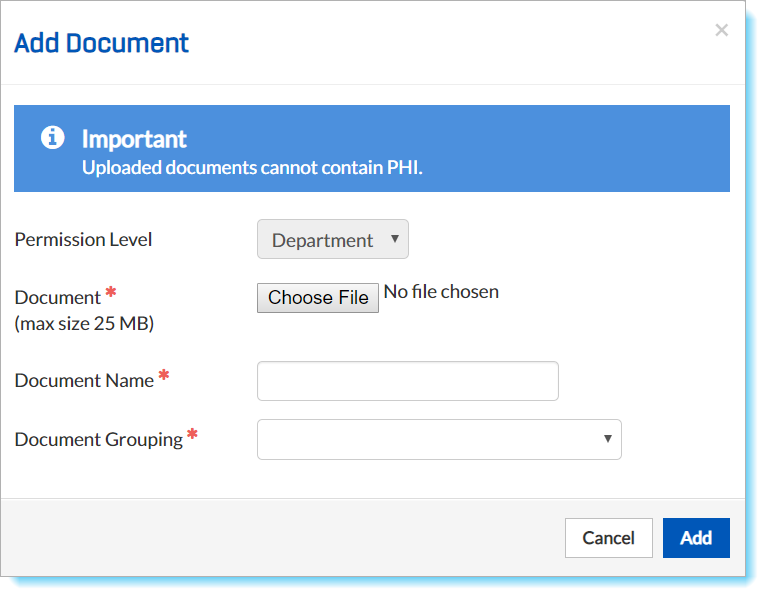
Click Add Document. The Add Document window opens.
-
For Permission Level, select the group that should have access to the document.
Note: Department Administrators can only upload documents for departments and, therefore, this field is read-only for such administrators. -
Click Choose File. Follow browser prompts to locate and attach the appropriate file.
-
For Document Name, enter a readily identifiable name for the document.
-
For Document Grouping, select the appropriate category that the document belongs to.
Note: A default selection of groups appears in the list. Additional groupings can be added. -
Click Add. The TripTix Document section reappears.
-
Click Save.
Note: It is not possible to edit a document from within the application. Edit the document in its original application. Next, delete the inaccurate version and upload the edited version.
To Delete a Document
-
From any page, go to Administration:System Settings.
-
Click the Documents tab.
-
In the TripTix Documents section, locate the appropriate document and click its corresponding Delete link.
-
When the confirmation window opens, click OK.
-
Click Save. Clicking Delete alone does not delete the document—you must click Save for your changes to be retained.