About the "Other" Tab
The Other tab (found at Administration> System Settings) allows you to turn features and fields on and off to determine whether they appear on the associated pages in the system. Changes to system settings must be saved by clicking Save in the lower right-hand corner of the page. A confirmation message is shown when settings were changed appropriately.
Other Settings Sections
The tab is organized into the following sections:
|
- Addendum |
- TripTix |
Addendum
About Addendum
Ad Hoc Addendum
If On, users may request an ad hoc addendum for a finalized run record within the defined timeframe.
Request Addendum
If On, those with appropriate permissions can send finalized, billed run records to the Addendum queue.
Back to Top
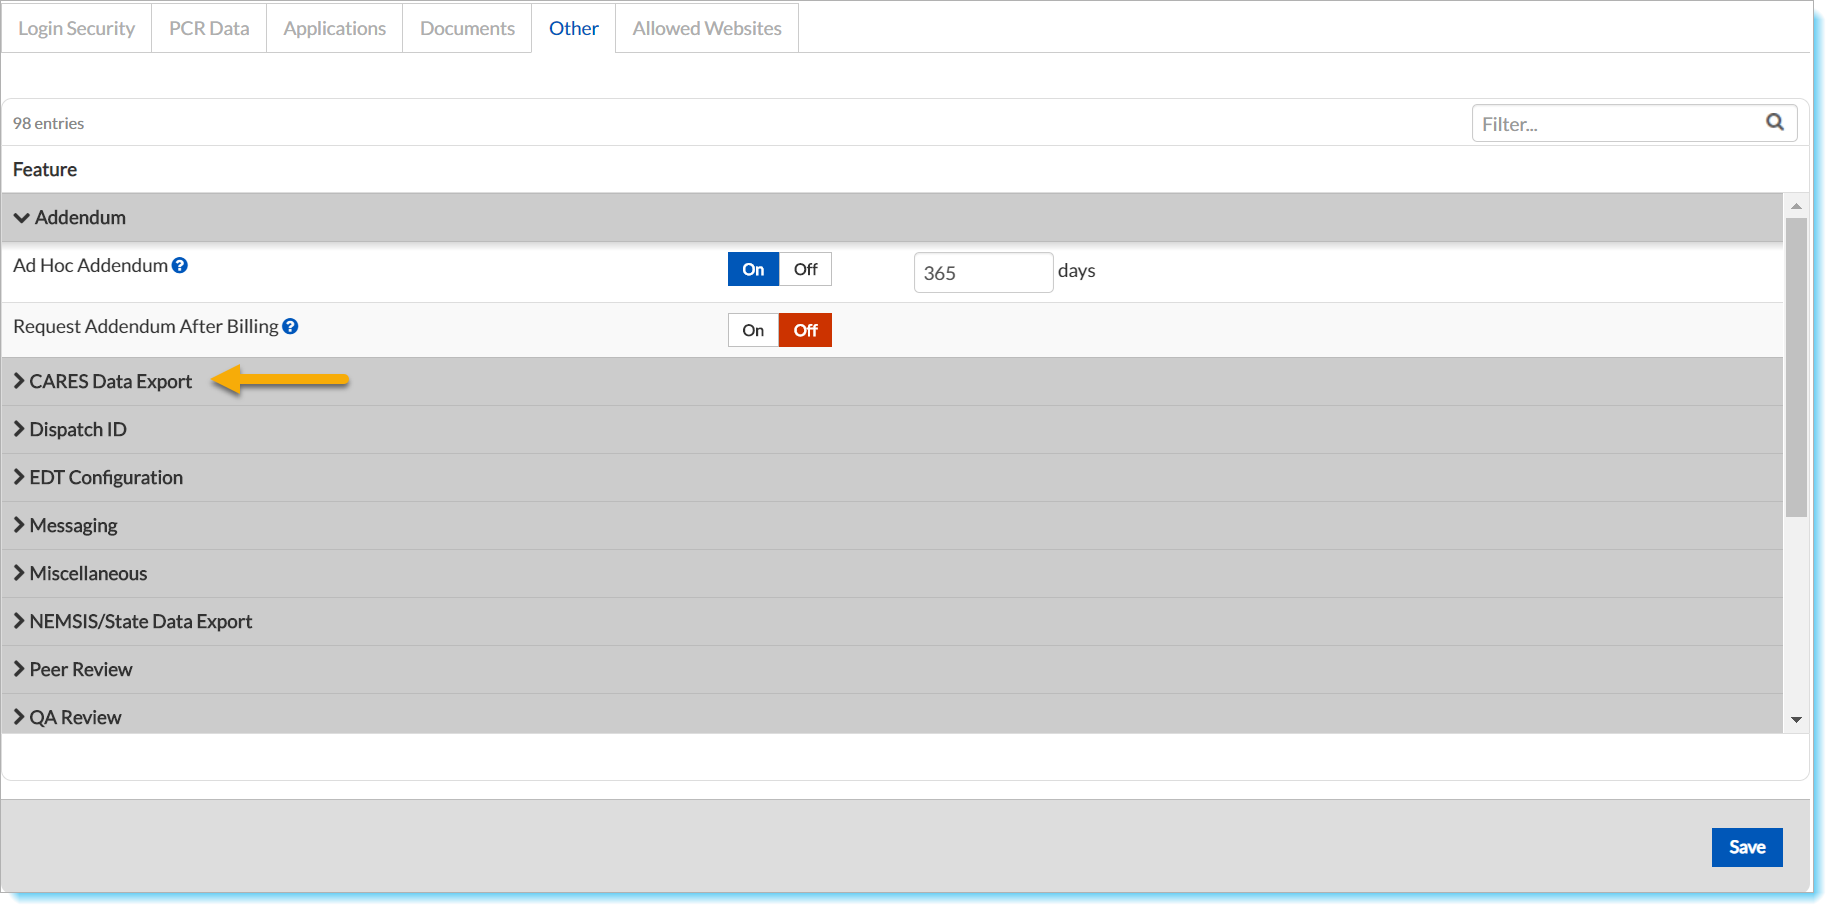
CARES Data Export
About CARES Data Export
Use the CARES Data Export section to determine data sent to the Cardiac Arrest Registry to Enhance Survival (CARES), if applicable for your agency.
Use CARES
If On, additional fields required by CARES appear in the Cardiac Arrest section for responders to complete when they document a code.
CARES Check First Responder Times
If On, ambulance times from the sequence chart (Assessments table) are copied over to the first responder times.
Note: This can only occur if your agency is the first responder.
Back to Top
Dispatch ID
About Dispatch ID
Use the Dispatch ID section to toggle on and off the Populate Response Number from Dispatch ID function. From this section, you can also enable auto-numbering of dispatch IDs.
Use Auto Numbering
Enables automatic numbering of newly created ePCRs
Next Auto Number
Sets the starting ePCR number to be used when automatic numbering is enabled
Disable Manual Entry
Prevents users from manually modifying the ePCR's automatically generated run number
Allow Duplicates
Allows ePCRs with identical Dispatch IDs to be created; functions independently of auto-numbering
RegEx Helper Text
Displays a helpful message when a user enters a Dispatch ID that does not match the defined RegEx and prompts the user with the expected run identifier format
Allow Supervisor or Manager Override
Allows a Department Supervisor or Manager to override a Dispatch ID and manually enter an ID of their choosing, even if Disable Manual Entry is On
Auto Number Identifier
Defines whether the Dispatch ID field or the Response Number field should be used to set the automatic number. The chosen field will also be the primary number for identifying ePCRs when browsing CDX.
RegEx Severity
Controls whether an error or warning is generated when the provided RegEx for a Dispatch ID is not met
Date Prefix Format
Allows for a date prefix to be automatically added to a Dispatch ID
Custom Prefix
Automatically adds a user-defined prefix to a Dispatch ID
RegEx
A regular expression that can be entered to enforce the format and length of a Dispatch ID
Back to Top
EDT Configuration
About EDT Configuration
Use the EDT Configuration section to take advantage of the Everyday Triage (EDT) feature. If your associated state, county, or department uses EMTrack®, EDT can prove a vital tool for you and your fellow responders in the field. This section allows you to configure EDT features that will facilitate information sharing.
Use EDT
If On, an additional Everyday Triage subsection becomes available in the Scene section of the run record in TripTix Windows
EMTrack System Name
Name for this department’s EMTrack system
EMTrack Division Name
Name for this department’s EMTrack division
EMTrack Username
Username for your department’s instance of EMTrack
EMTrack Password
Password for your department’s instance of EMTrack
EMTrack Incident Data Format
Date format used for auto-generating EMTrack incidents when an incident is not selected.
EMTrack Incident Prefix
Either On or Off, a prefix to add to the EMTrack incident date format when no incident is selected.
Back to Top
Messaging
About the Messaging Section
Default Messages as 'Reply All'
If On, any in-application message that is sent will include the Reply All button and default to this option.
If Off, recipients of an in-application message can select Reply or Reply All.
Max 'Reply All' Recipients
Enter a number for the maximum number of individuals who can receive a Reply All message.
For example, if set at 20, users cannot click Reply All if doing so would send the reply to more than 20 users.
The Default Messages as 'Reply All' option must be selected for this setting to apply.
Back to Top
Miscellaneous
About the Miscellaneous Section
Email Custom From Address
If On, emails sent from the TripTix CDX system are labeled as "From" a user-defined sender name.
If Off, system-generated emails labeled as "From" the default no-reply address.
In either case, the Reply address is the default TripTix address.
Back to Top
NEMSIS/State Data Export
About NEMSIS/State Data Export
Use the NEMSIS/State Data Export section to toggle on and off the Use Unit Notified By Dispatch Date/Time function. By default, this function is On.
If turned Off, event start and end dates for State or NEMSIS exports are based on the date and time the call was received in the system.
Back to Top
Peer Review
About Peer Review
Runs arrive in the Peer Review queue after they have been finalized, passed validation, sent to billing, and have been through Supervisor Review. Use this section to manage Peer Review settings.
Peer Review
If On, Peer Reviews are enabled for your departments and agencies.
First Reminder
If On, users assigned to perform a peer review receive a notification that they have a pending review. Use the text field to define how many hours (0-48) prior to being released from review that the notification is sent.
Second Reminder
If On, users assigned to perform a peer review receive a second notification that they have a pending review. Use the text field to define how many hours (0-48) prior to being released from review that the second notification is sent.
Note: The integer entered for the Second Reminder cannot be greater than that of the First Reminder.
Send Reminders To
If On, enter the email addresses of the users you want to receive peer review reminders. Use a comma to separate multiple addresses.
Note: This setting is used in conjunction with the First and Second Reminder settings.
Release Pending Review Run
Time in hours after which a run is released to the next step in the process, even if an assigned peer review has not been performed. If "0" is entered for this field, this function is turned Off. The maximum allowed time is 120 hours (5 days).
Note: The Release Pending Review Run time must occur after the First and Second Reminder.
Back to Top
QA Review
About QA Review
Use the QA Review section in the Other system settings tab to manage QA Review settings.
QA Review
If On, QA Reviews are enabled for your departments and agencies. After runs are approved and released by Supervisor Review, ePCRs are automatically routed for QA Review.
Manual QA Review
If On, manual QA reviews are allowed.
First Reminder
If On, users assigned to perform a QA review receive a notification that they they have a pending review. Use the text field to define how many hours (0-48) prior to being released from review that the notification is sent.
Second Reminder
If On, users assigned to perform a QA review receive a second notification that they have a pending review. Use the text field to define how many hours (0-48) prior to being released from review that the second notification is sent.
Note: The integer entered for the Second Reminder cannot be greater than that of the First Reminder.
Send Reminders To
If On, enter the email addresses of the users you want to receive QA review reminders. Use a comma to separate multiple addresses.
Release Pending Review Run
Time in hours after which a run is released to the next step in the process, even if an assigned QA review has not been performed. If "0" is entered for this field, this function is turned Off.
Note: The Release Pending Review Run time must occur after the First and Second Reminder.
Back to Top
Supervisor Review
About Supervisor Review
Use the Supervisor Review section to manage Supervisor Review settings.
Supervisor Review
If On, Supervisor Reviews are enabled for your departments and agencies. After runs are finalized by their owner and have passed validation, ePCRs are automatically routed for Supervisor Review.
First Reminder
If On, users assigned to perform a supervisor review receive a notification that they have a pending review. Use the text field to define how many hours (0-48) prior to being released from review that the notification is sent.
Second Reminder
If On, users assigned to perform a supervisor review receive a second notification that they have a pending review. Use the text field to define how many hours (0-48) prior to being released from review that the second notification is sent.
Note: The integer entered for the Second Reminder cannot be greater than that of the First Reminder.
Send Reminders to
If On, enter the email addresses of the administrators you want to receive supervisor review reminders. Use a comma to separate multiple addresses.
Release Pending Review Run
Time in hours after which a run is released to the next step in the process, even if an assigned supervisor review has not been performed. If "0" is entered for this field, this function is turned Off.
Note: The Release Pending Review Run time must occur after the First and Second Reminder.
Send Unreviewed Fax
If On, a fax of the run record is sent to the receiving facility, if applicable, even if it did not undergo a supervisor review.
Note: For calls without a receiving facility, such as Canceled calls, faxes are not sent.
Manual Supervisor Review
If On, manual QA reviews are allowed.
Back to Top
TripTix
About the TripTix Section
Use the TripTix section to manage basic tasks, elements, and features of the TripTix solution, such as fields that appear in the run record, whether or not narrative templates can be created by users, and more.
Collection of Seconds for Times
If On, hours, minutes, and seconds are recorded on time fields.
If Off, only hours and minutes populate the time fields.
Allow Insurance Manual Entry
If On, users may manually input data in the record’s Insurance section, rather than being required to choose and option from a drop-down list.
If Off, users are restricted to selecting options within the drop-down lists.
Use Cardiac Arrest Fields
If On, a new Cardiac Arrest section, with its own unique fields, opens when a medic indicates a cardiac arrest-related run. The Cardiac Arrest section can assist medics in documenting all elements of the cardiac arrest, including those fields that are helpful for reporting and statistic gathering.
Use Default Medic Signatures
If On, the system automatically uses the report writer’s saved signature to populate the Crew Signature field.
Note: The medic must have a saved signature in the system for this feature to work.
Patient Email Consent
If On, the Electronic Consent fields are added in the Patient Contact Information and Closest Relative or Guardian sections. If Off, no emails or text messages can be sent to the patient.
Dispatch Uses EMD
View PDF For Repetitive Patient
If On, a PDF button appears next to repeat patients when a patient lookup is performed. Click or tap the PDF button to view up to the five most recent PDF run records for the repeat patient.
Automatically Attempt to Obtain Incident Census Tract
If On, TripTix automatically attempts to obtain the Census Tract value for the Incident Address if one has not already been entered at the time of run finalization.
Auto-Fill EMS Work Related Exposure Table
If On, the EMS Work Related Exposure table in the Outcome section of the run record is automatically populated with the crew members on the run. Furthermore, the PPE, Suspected, and Type fields are also populated with default values you select.
Auto-Fill ALS Assessment PIN
If On, the PIN is no longer requested when you go to the Assessment section and select Yes for ALS Assessment Performed and Warranted. By default, this setting is Off.
Auto-preview PDF Before Finalization
If On, the user is automatically presented with a PDF of the run record before the run can be finalized. This feature is Off by default.
Show Completed Addenda/Corrections
If On, search results include run records with both incomplete and completed addenda or corrections.
Auto-Finalize Reviewed Runs
If this function is On, (the default), runs that have been reviewed or “sent back” will be automatically finalized. (“Sent back” runs include those with corrections made to them and those with addenda initiated by TripTix.) The date and time for auto-finalizing the run is displayed on the Pending Review window, found at Run Records> Pending Review.
If the function is set to Off, previously reviewed runs will stay in the Pending Review queue.
(Note: Unless a run is first reopened for further review, it will auto-finalize at the date/time shown.)
To review a run's access history, go to the run Summary screen.
- Click the Actions menu button.
- Choose View Detailed Access History from the menu.
Back to Top
TripTix CAD
About TripTix CAD
Use the TripTix CAD section to manage how data is imported from CAD.
Import Fire Number as
If On, when importing CAD data, the Fire Number will be imported to Report ID/Number field of the run record, in the Outcome section. If Off, the Fire Number is imported as the Response Number in the Incident section.
Import Records without a Vehicle
If On, the system imports all CAD records. If Off, CAD data is only imported if a vehicle already exists in TripTix CADRecords.
Import Other Incident Number as
If On, the Other Incident Number is imported as the selected Report Type.
Overwrite Data with Imported CAD Data
If On, existing data is replaced with data imported from CAD.
Include Update Button for New CAD Data
If On, a button is available that will update data if new CAD data becomes available after initial import.
Populate Scene Location From
For those cities with more than one ZIP Code, this setting allows agencies to choose how this is resolved, based primarily on what CDX receives from CAD. If On, CAD populates scene location data fields based on your selection of the following:
-
CAD City/State – populates scene ZIP based on City/State.
-
CAD X/Y Coordinates – populates scene ZIP based on GPS location.
-
CAD ZIP – populates scene ZIP based on ZIP code. This is the default setting.
-
Do Not Populate – does not populate scene ZIP data. Crews must enter this data manually.
-
Specify Default Location – populates scene ZIP based on a pre-selected default location. This location is used regardless of CAD data.
Note: This setting should be configured in communication with your department’s CAD subject matter expert.
Default Scene Location
If Specific Default Location is selected for the drop-down above, select the default location information that should automatically populate scene location data fields in the run record whenever CAD information is imported.
Back to Top
TripTix Faxing
About TripTix Faxing
Use the TripTix Faxing section to manage when faxes are sent, whether users have the option to send manual faxes, and which documents faxes should include.
Fax Finalized Patient Care Record
If On, completed patient care records are automatically faxed to the destination hospital or facility to which the patient was transported.
Manual Faxing Number
If On, the Print/Fax link is shown in the TripTix Windows main toolbar. If Off, only Print is shown, and the Fax column and buttons are not included on the Recent Records page.
Manual Faxing
If On, users have the option to manually fax drafts from within the ePCR If Off, users cannot manually fax a record. Runs are faxed automatically and only upon finalization.
Manual Fax Includes EKG Attachments by Default
If On, when a user sends a manual fax of a run record, EKG attachments are included by default.
Include Signature Documents on Unreviewed Fax
If On, when an unreviewed fax is sent, signature documents are included in the faxed run record by default.
Include Signature Documents on Finalized Fax
If On, when a finalized fax is sent, signature documents are included in the faxed run record by default.
Include EKG Attachments on Unreviewed Fax
If On, when an unreviewed fax is sent, EKG attachments are included in the faxed run by default.
Include EKG Attachments on Finalized Fax
If On, when a finalized fax is sent, EKG attachments are included in the faxed run by default.
Back to Top
TripTix PDF
TripTix PDF
Use the TripTix PDF section to manage what data is shown on PDF versions of the run record.
Include Signature Documents on Unreviewed PDF
If On, signature documents are included on the unreviewed PDF of a run record by default.
Include Signature Documents on Finalized PDF
If On, signature documents are included on the finalized PDF of a run record by default.
Include EKG Attachments on Unreviewed and Incomplete Runs PDF
If On, EKG attachments are included on unreviewed or incomplete PDF of a run record by default.
Include EKG Attachments on Finalized PDF
If On, EKG attachments are included on the finalized PDF of a run record by default.
Hide Empty Fields on PDF
If On, fields without data are not included in the PDF, creating a more streamlined version of the document. The default setting is Off.
Allow Sections to Split Between Pages
If On, a section may be divided between two or more pages to conserve space in the PDF. If Off, all attempts are made to keep content within each section together, which can result in excess white space and pages. The default setting is Off.
Show SSN
If On, the patient’s Social Security Number (SSN) is shown on the PDF.
Show Only Last Four Digits of SSN
If On, only the last four digits of the patient’s Social Security Number are shown on the PDF, keeping all initial numbers of an SSN exclusively listed as asterisks for identity privacy.
Back to Top
TripTix Windows
About TripTix Windows
Use the TripTix Windows section to control settings and features available to users when they are documenting a run record using TripTix Windows.
Use Signature Documents Locking
If On, completed signature documents are locked and cannot be edited.
Department Locked Hardware Mode
If On, users are prevented from accessing unapproved areas of the operating system or other applications while using department hardware. This setting applies to all users in the department for whom it is set.
Use Inking
If On, users have the option to enter reports on their Toughbook® using a stylus as a writing tool.
Delete Camera Images
If On, images taken with a TripTix-enabled device are automatically deleted from the device at a time you select. Use the text field to indicate when images will be permanently deleted. Enter a number in days. (Note: Only images that are not part of an official run record will be deleted.)
Clear Preset Crew
If On, preset crew information will be cleared at the times you specify.
Clear Preset Crew [Upon New Login]
If On, preset crew information will be cleared if a user who is not part of the preset crew logs in.
Create Blank PCR from CAD
If your department has CAD import capability, when this option is On, users will be able to make some choices about the ePCR, as follows:
- Choose CAD incidents to include as part of a new ePCR, then clicking Create Blank PCR
- Create a new ePCR that is blank, by clicking Create Blank PCR
Table View Editing
If On, elements within a run will be displayed in a table view, instead of as individual elements in a list. The user screen is divided vertically, with the sequence chart on the left and data entry fields on the right.
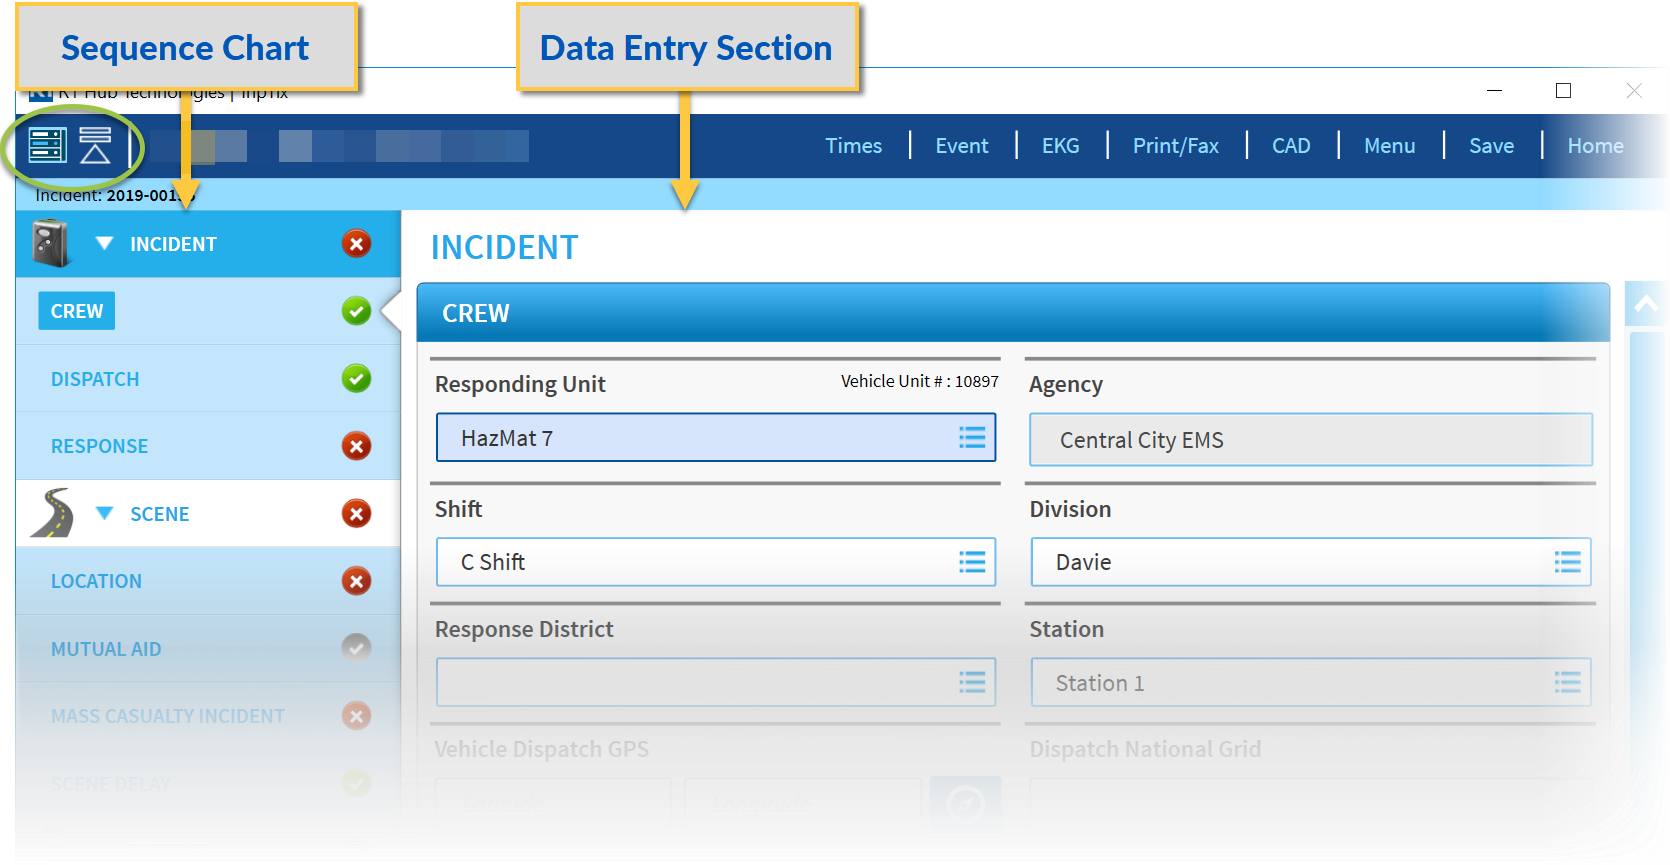
If an individual user prefers to view events as a screen-wide list, clicking the Table View icon ![]() at the upper-left of the screen will change the view. Clicking the icon again will return the screen to Table Edit View.
at the upper-left of the screen will change the view. Clicking the icon again will return the screen to Table Edit View.
Requirement Indicator
If On, the Requirement Indicator button appears in the bottom toolbar of TripTix Windows. It displays the number of errors in the record, real-time. A medic can tap it to view and correct the errors. 
The Requirement Indicator setting is Off by default. When it is Off, the Requirement Indicator will not appear.
Use Preset Crew Signatures
If On, users can add a signature for each crew member who is part of the preset crew. Signatures can ben be applied to all records for those member.
If Off, crew members must sign each run record manually.
Expand Subsections
If On, subsections of the Sequence Chart (side navigation menu) display beneath their section headers.
Expand Subsections defaults to Off . When it is Off, the subsections will only appear when a user clicks the section header.
An individual user can expand or collapse subsections at any time by
- Clicking the Expand icon: ![]() , or
, or
- Clicking the Collapse icon: ![]() .
.
The Expand and Collapse icons are only displayed in Table Edit View.
No PCR Needed
If On, users will be allowed to select No PCR Needed from a CAD import. A new ePCR will open a new ePCR, link the CAD data, will fields completed according to settings managed by the department. Users will re a complete—or mostly complete—report that can be finalized in very little time.
To use this feature, simply locate a CAD import on the Dashboard, tap the Menu button, and select No PCR Needed. The application will open a new ePCR, link the CAD data, complete fields according to settings managed by your department, and present you with a complete—or mostly complete—report that can be finalized in very little time.
No PCR Needed Default Disposition
Choose a default patient disposition to be entered when a user selects your department's No PCR Needed option. This option is disabled if No PCR Needed is toggled Off.
Back to Top
TripTix Windows External Devices
Use the TripTix Windows External Devices fields to turn on or off the types of devices that your department will use to run the program.